
DISCLAIMER: I, Erik Wallebom, are NOT to be held responsible for any problem or damage
you may encounter on yourself or your car or something else by you doing one or all of the following procedures.
I am not a professional mechanic and I am sure all this can be done in a better way. But so far my car has been working great.
[COLOR="Navy"]Aquiring the diff. Day one.[/COLOR]
I used http://www.bildelsbasen.se/.
It is a swedish web site which has a database containing spare parts from wrecked cars in sweden. Very useful.
I searched for a M5 differential and found a BMW E34 M5 3.91 diff nearby where I live.
I went there and compared it to a BMW 850 3.15 diff they had in stock to make sure it would fit.
The housing looked the same. I bought the M5 diff for 5000 SEK (about 500 USD).
It had been used on a stolen M5 of 12000 km (7500 miles) which had had it's doors and hood disassembled by the thiefs.
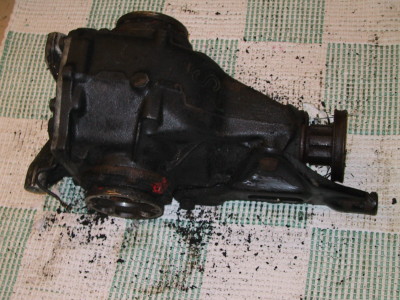
This is what the M5 3.91 LS diff looked like when I bought it.
[COLOR="Navy"]Finding a good place where swap could be made. Day two. [/COLOR]
I put the car on jacks in my parents garage. It's not a indoor garage and it was -15 deg. celcius outside. But since I did my lowering springs change last year in a snowy minus environment I though I could stand the cold this time too. But when I laid myself on the back and slided in beneath the car looking at all the screws, nuts and bolts in all the hard to reach places I understood that this was not going to work. I went to the local gas station to see if I could rent a DIY car lift. It would cost me 88 SEK (8,8 USD) per hour. That's not too much if it would take about 10 hours but since it was not an easy job I didn't know how long it would take and also there was a lot of guys washing their cars there so there was a lot of water in the air I decided this was not the right place for a diff. swap.
I was starting to give up but then I realized that no one worked at my fathers work during the christmas weekend and the building has a warm garage. With help from my parents I gathered all my tools and went there. It took some thinking of how to set up the car because I knew I had to turn the wheels during the process in order to loosen some bolts. Finally we came to the solution you can see at the picture.
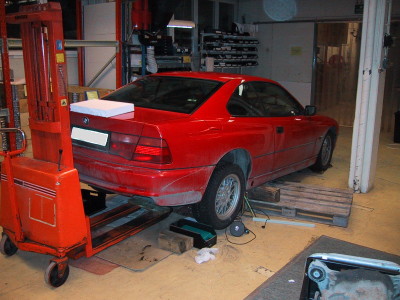
The car is positioned on the golden jacks located in front of the rear wheels. Wooden pallets for security if car would fall down. Orange pallet lift used to lower the heavy (48 kg) diff when removed.
Removing the exhaust system.
I recommend removing the exhaust system before diff removal. Otherwise the piping will be in the way.
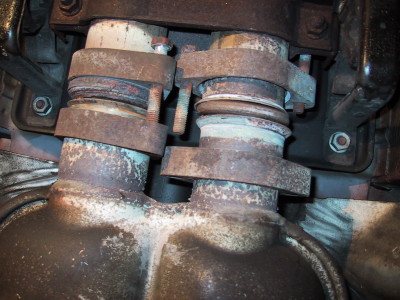
1. Remove the 2 nuts and 2 bolts for the silencers in the middle of the car but don't pull the piping loose yet.
2. Unscrew the 4 nuts for the rear silencers.
3. One person holds the rear silencers up (otherwise the piping will bend I'm sure) and one person lies on back under the car unhooking the silencer in the middle of the car (need strong arms, heavy). Dont forget the metallic gasket ring in one of the pipes under the car.
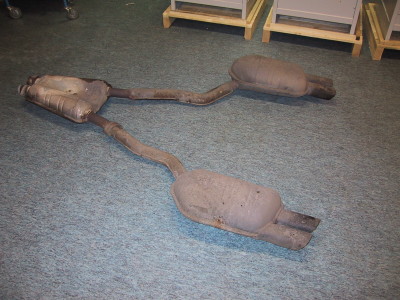
The removed exhaust system. Heavier than it looks.
Removing differential.
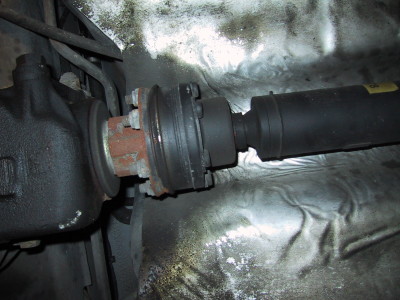
1. Disconnect the speedometer cable. Located on the back plate. Absolutely the easiest task!
2. Remove 6 nuts and 6 bolts for the input shaft.
May have to use hammer to loosen the bolts when nuts are gone.
The shaft should get loose but may not get past the diff input shaft cup.
Let it hang there. Also there is a rubber gasket inside the cup. Don't loose it.
3. Use a big insex screw and maybe a pipe extension for better torque to loosen the 12 insex screws on both left and right output shaft. These were very hard to get loose on mine. Sometimes I had to push with the leg. Maybe have to use hammer to knock on the shaft ends to loosen them from the output shaft cups. When loose, let them hang, they may not get out from the cups.
4. Now it's getting tricky because of the high weight of the diff. - almost 50 kg !! I used the orange pallet lift in order to lower the diff when bolts where being removed. Remove the two rear bolts. These are very hard to get loose because they are located way up in a narrow area. If you remove the plastic cable holders (by pushing back the expander pins) it gets less hard. I used a cardan joint attached to the right sized bit and an extension shaft to be able to get to the screw head. Still not easy and took a lot of tries. You can also use a bit and a shaft with a movable head, then push the shaft up behind the shield. It's hard to explain the procedure. Try for yourself. It can be done.
When the two rear bolts are removed then remove the two bolts located in the front of the diff. You can actually unscrew the big bolt above them but I found it is easier to leave the diff mount attached to the car.
5. Lower the diff. It is now free!
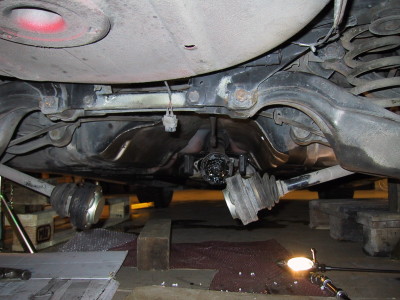
Not a healthy working environment.
I wish I had a power lift. But maybe then there would have been problems lifting the differential unit.
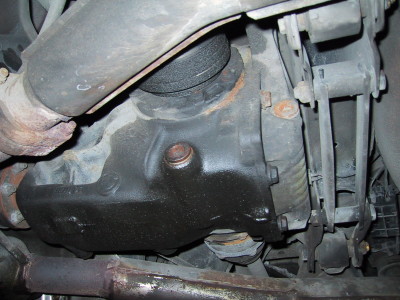
My old 3.15 diff fitted on my 850.
Swapping back plates.
1. Remove the M5 mounting arms from the new diff (if there). Also remove the back plate. Let diff stand on input shaft so oil wont flow out.
2. Fill with new fresh oil if no oil inside or old oil are inside. I don't know how much, I compared to old diff.
3. I used some "blue gasket on tube" on the old dry M5 diff. gasket to make sure no oil would leak out.
4. Remove the old back plate from 850 diff. and mount it on the new diff.
5. The input and output shafts looked the same on both units so I didn't change them.I was curious of how to do that but did not succeed to even remove one of the output shafts. Can someone tell me how to do this?
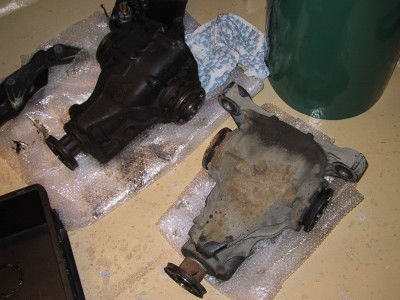
Both units side by side. Left: M5 3.91 LS, Right: 850 3.15. The input and output shafts looks the same.
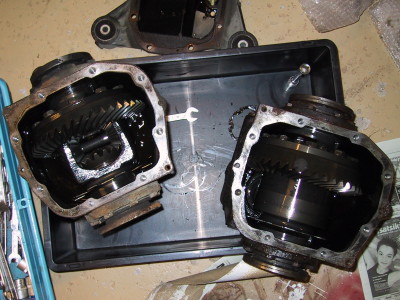
Both units. Left: 850 3.15, Right: M5 3.91 LS. You can see a difference,
The 850 has an open inner casing. The M5 has not.
[COLOR="Navy"]Fitting the new diff. Day three. [/COLOR]
I didn't use the orange pallet lift much this time. Instead I used a small hand pumped pneumatic jack.
1. Put the front of diff on some pieces of wood so it points towards the gearbox output shaft. Then I was on my back pushing the back of the diff up so a friend of mine (thanks Lennart!) could place some pieces of wood also under the back of the diff. Finally it was so high up I could fasten the input shaft with the 6 bolts and nuts. But don't forget the rubber gasket. It can be hard to place this correctly but if you push the bolts trought the holes of the shaft then you can place the gasket inside between the bolts. Push the diff forwards so the bolts go into the holes and tighten all the nuts slightly for now.
2. Attach both left and right output shafts and insert some of the screws slightly. On the old diff when I had got the insex screws loose I could turn them using my fingers. But on the new M5 diff the screws were very hard to turn. I think some rust had gotten into the threads because it was an exhausting job to fasten all the bolts. When the bolts came out on the other side I could see that the threads where a bit topped off. Maybe they wheren't compatible with the M5 diff?!? Anyway, they are fastened for sure.
3. Use the pneumatic jack to heighten the diff so one of the front bolts can be inserted and turned a couple of turns. I did this when the diff was a bit off axis and the scew went in in the wrong angle. Some threads got damaged but it went OK in the end anway. But be careful.
4. Highten the diff even more so you can insert both left and right bolt and put on the nuts. A bit tricky!
5. Attach the other front bolt.
6. Now the diff is in place! Tighten ALL the screws. I don't know the exact torque for them though. Also one of the bolt holes on the diff are not used in the 850. You may want to cover it up with one of the bolts from the M5 diff.
7. Connect speedometer cable.
Fitting the exhaust system.
1. One or two persons lift the rear silencers and one person hooks the piping together under the car.
2. Fasten the 4 nuts for the rear silencers.
3. Fasten the 4 nuts and 4 bolts under the car. Dont forget the metallic gasket ring.
Test drive.
Be careful the first miles to see if everything seems to work fine. Then when you think it's OK put the pedal to the metal and find out if it was worth the swap. I haven't measured the change in performance but I will. I can say that when I found a somewhat dry spot in a tunnel and used full throttle there was a big difference and finally it felt like a 300 hp V12.
Good luck.Erik W