Beiträge von revtor

    Zitat von hmg;131726

    How do they differ from the MAF in the 850ci?


    The S70 mass air flow sensor (MAF) has a much less restrictive large mesh grille and the platinum wire is shorter (different resistance) than the M70 MAF. The MAFs can be exchanged but an S70 runs very poorly with M70 MAFs and vice versa.


    The later M73 MAF uses a modern hot-film instead of the fragile platinum hot-wire. Hot-film MAFs are cheaper and more reliable than hot-wire MAFs but they are not electrically exchangeable. Nevertheless, member fuzzifikation developed an adapter to use modern hot-film MAFs on the M70 (and with software adjustments probably the S70 as well).

    Tor K: A fuse holder with only two fuses of 10 and 25 A? That has to be the auxiliary fuse box and the fuses are F50 (10 A) and F51 (25 A). These fuses are used only for the park ventilation/heating system (if equipped). So unless someone has gone creative on the wiring, I'm afraid that fixing the cracked fuse holder has nothing to do with the instrument cluster coming back to life. It's probably just coincidence and the instrument cluster can probably die any time again.


    There have been quite a few reports of the odometer lights staying on. The problem is that most cases did not report back with a solution (if there ever was one). Some mention low battery voltage (so make sure your batteries are good and charged), one person had luck with disconnecting the factory car phone (although the issue returned later), another found that a broken door handle kept triggering the microswitch and prevented the car from sleeping, but by far the most common issue appears to be with the instrument cluster itself. It's not clear what exactly is wrong with it, but replacing the instrument cluster fixed the issue for several people.


    Danilo: Do you have a link to a topic where replacing the capacitors fixed this particular issue (odometer lights staying on)? I know of several topics where replacing the instrument cluster fixed the issue, but I could not find any of a successful repair (or even an attempt).


    One of my test instrument clusters has a badly leaking capacitor but so far it's not causing any funny behavior. I've cleaned the electrolyte from the PCB so it can't do any further damage but I did not replace the capacitor. I'm somewhat hoping it will act weird in the future so we'll know for sure replacing the capacitors fixes anything.


    Nevertheless, replacing the electrolytic capacitors is probably a good starting point, though. Capacitors are dirt cheap and even if doesn't fix the issue, it doesn't hurt.


    For anyone wishing to replace the electrolytic capacitors in the instrument cluster: The instrument cluster electronic backplane is not meant to be serviceable. The PCB is mounted to the frame with plastic rivets which have to be drilled. You will not be able to reuse the rivets but try to avoid damaging the plastic studs any further than required. For those deciding to replace the instrument cluster instead of repairing the bad one, please consider donating the bad one to a member with electronic skills so, maybe, something can be learnt from it...

    Please be more verbose. You replaced fuses, which ones (they are numbered) and were the original fuses blown?


    Judging by your earlier posts describing the warning lights and instrument cluster test, all fuses from the instrument cluster (F1, F17 and F55) looked okay.


    Was the instrument cluster back working a direct result of replacing the fuses (in your opinion)?

    The E31 instrument cluster and the body electronics module (EKM) form a pair and in case of problems it's often very difficult to isolate the problem to one of both.


    The instrument cluster test is not a good indication. For example, member sandwich had a cluster with all gauges dead except for the speedometer. In the instrument cluster test all four gauges operated normal so it was assumed the fault had to be the EKM. In the end it turned out to be the instrument cluster after all...


    Visual inspection of the modules is a good start but no visible damage does not mean the module is not faulty. A simple thing like an aged electrolytic capacitor which is not yet leaking but also no longer in-spec might cause faults with no visible damage.


    Another thing to try is the service menu on the MID (see instructions to unlock the service menu). After unlocking the service menu, select entry 08 (current speed) and drive a short distance. Does the digital speedometer work? If yes, the EKM is certainly not dead and it might be more proof that the fault is in the instrument cluster, but it's no guarantee.


    You may also wish to read the fault codes from the EKM module.


    If there are no signs that clearly hint at one of both modules, the best and quickest way to identify the faulty module is by simply replacing the instrument cluster. If the problem persists, it's the EKM. If it's fixed, it was the instrument cluster. By replacing I do not mean buying a new one from BMW which is ridiculously expensive, but either borrowing one from a fellow E31 owner or scoring a cheap second hand one. Please note that you can't simply put a used instrument cluster in your car - the gauges will remain dead and the odometer will read EEEE. You must first reset the used flag with BMW diagnostic software (see instrument cluster swap).


    Another module in the car, the A1 general module (GM), is notorious for its failing electrolytic capacitors. Electrolytic capacitors have a finite life span and the ones used in this modules are not of the best quality. Replacing the bad capacitors with new ones is very cheap and has a high success rate. It has been suggested that similar capacitor issues could be the cause of issues with other modules, like the EKM or instrument cluster. Note that there is not any hard proof for it yet. Nevertheless, if you are electronics-savvy you may wish to replace the electrolytic capacitors in both EKM and instrument cluster.

    Some of you may remember that I built a custom BMW Indianapolis Pro many years ago (see first attempt, second attempt and later improvements).


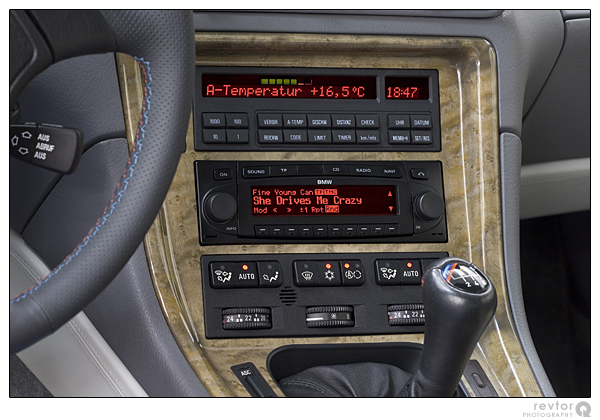
    I really like the final result but after I exchanged the BMW Indianapolis BE7969 main unit for a Becker Indianapolis Pro BE795x (to be able to use the Becker Remote Kit for iPod MP3 playback) I lost the BMW startup logo. A minor issue of course, but after going through all the effort to get a proper negative display in the headunit it felt like the mod was not complete. Back then I looked briefly into changing the startup logo but got nowhere...


    I had already long given up on changing the startup logo when I was contacted by a Spanish trio who managed to locate the startup logo in the 24C64 EEPROM on the PCB of the main unit (see their thread at bmwfaq.com [Spanish]). This inspired me to take another look at my custom BMW Indianapolis Pro.


    I downloaded a handful of binary dumps from various Becker headunits to investigate the logo format. Once I felt confident enough I tried changing the logo on one of my spare units.


    The Spanish guys desolder the EEPROM from the PCB for reading and programming but I was not sure I could remove the tiny TSSOP8 IC without damaging the PCB so I tried in-system programming (ISP). I followed the traces from the EEPROM to the nearest vias and components and soldered small gauge wires to these. This way I was able to dump the EEPROM contents but I could not program it through ISP - there seems to be another I2C device on the PCB that interferes. So it seems desoldering is the only way.


    I did not want to desolder the EEPROM entirely but just isolate its power lines so I could use ISP without interference from other I2C devices on the PCB. Isolating Vcc looked somewhat tricky but isolating the GND is surprisingly easy. The entire left side of the EEPROM (pins 1 to 4) is connected to ground. What I did is inserting a small 26 AWG wire underneath pins 1 to 4, then heat the legs with a chisel tip while gently pulling the wire up. The EEPROM's left side came off the PCB cleanly - no damage done. Even if there would have been damage to the PCB it would be relatively easy to repair because all 4 pins just need to connect to the large ground plane. This also means that resoldering later on is quite easy - you don't have to worry about accidental solder bridges between the EEPROM's legs. They're all connected to each other anyways...


    I soldered a wire to the four lifted legs and connected that to the ground of my ISP programmer. I could now power the EEPROM without powering other devices on the PCB. For reference I used the ISP profile for an Atmel AT24C64 with decreased target voltage of 3.5 V, device address 000 and a 100 kHz clock. Now I was able to read and write the EEPROM!


    Time to put my knowledge of the logo format to the test. I wrote a small tool to facilitate replacing the logo in the binary dump (more on that further down). Testing a new binary was as easy as connecting the wire on pins 1 to 4 to a ground plane on the PCB or chassis. After a few experiments I was certain I nailed the logo format. Here's a test on one of my spare units:
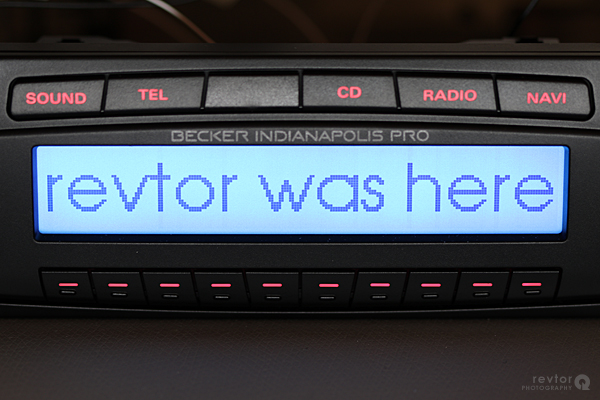


    Success! :cool:


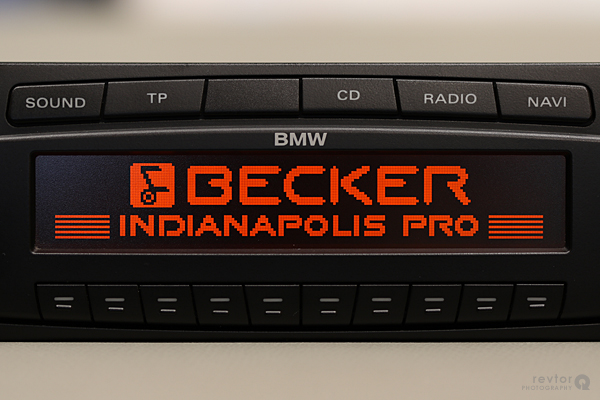
    I now knew my tool was able to patch new logos in binary dumps and partially desoldering the EEPROM turned out to be easier than expected. In the mean time I had already obtained the BMW startup logo from one of my donor BE7969 so it was time to change the logo in my custom BMW Indianapolis Pro! Here's what the startup logo of the Becker BE795x looks like:


    ...and an hour later:


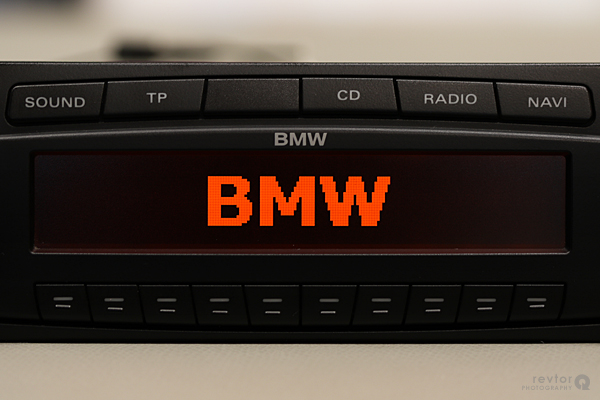
    My mod is finally done! :D


    Special thanks to puntoloco and govillard over at bmwfaq.com for inspiring me!


    [HR][/HR]
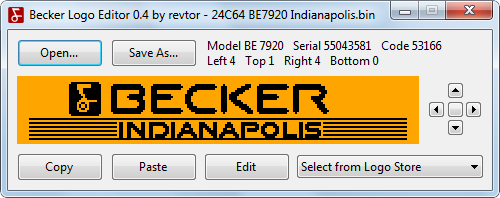
    In order to change the logo I wrote a small application that can read the EEPROM binary dump and replace the logo in there - the Becker Logo Editor:


    Download Becker Logo Editor (23.8 kB)


    Requirements


    • Microsoft Windows XP/2003 or newer
    • Microsoft .NET Framework 3.5 or newer


    The application is straightforward easy to use: Use the "Open..." button to load a binary dump, use "Save As..." to export the binary dump. By default the application will append "-new" to the filename to prevent accidental overwriting of the original binary dump. Opening and saving a binary dump - without making changes - might produce a binary that is not the same as the original. That's because the Becker Logo Editor maps the logo to a new canvas with logo maximum size. This is normal and intended behavior and does not cause any issues with the headunit. The Becker Logo Editor has been thoroughly tested and writes valid binaries for all images, but nevertheless make sure you keep a backup of the original binary dump.


    You can't draw in the Becker Logo Editor, but using the "Copy" and "Paste" buttons it is very easy to export and import images to and from other image editors like Microsoft Paint or even Adobe Photoshop. The "Edit" button opens the logo directly in Paint.


    The Becker screen is 201x34 pixels but the maximum size for a logo is 197x30 pixels (there's a 2-pixel border around the screen which cannot be used). Anything larger than 197x30 pixels will be cropped by the Becker Logo Editor. Grayscale or color images will be converted to black and white automatically but the Becker Logo Editor uses a rather crude algorithm for this. It's working fine to remove anti-aliasing from fonts but for graphics it's best to convert your custom image to black and white in a proper image editor before copy/pasting to the Becker Logo Editor.


    You can use the "Left", "Up", "Right" and "Down" buttons to position the logo on the screen. Use the middle button for automatic centering. You can't move a logo all the way to the edge of the screen because of the 2-pixel border mentioned before.


    There's also a small set of manufacturer logos built-in - the Logo Store. Handy if you are not looking for a custom logo but just want your car's manufacturer logo, or return to the original Becker logo, or even just a blank startup screen. These manufacturer logos were gathered from read EEPROMs and downloaded binary dumps found on the Internet. If you stumble upon a manufacturer logo or a variation that is not yet in the Logo Store, please send me the binary dump!

    csi Rider: EWS might prevent you from starting the engine but it should not affect diagnostics... Double check whether the DME is properly grounded, gets power (permanent & switched) and the RxD/TxD wires connect to the diagnostic plug.


    By the way, you may not have chosen the easiest engine to mate with a manual transmission. That engine came from an E38 mated to an automatic transmission. Unlike older engines like the M70 and M60, the M73/DME5.2.x has a much tighter integration with the EGS transmission control unit over a digital CAN bus. The engine may refuse to operate normally (ie limp home mode or perhaps no start at all) if it can't communicate with the EGS (assumption, I don't know for sure). The problem with the M73/DME5.2.x is that it was offered only with automatic transmission. So there are no manual transmission cars to swap the DME or the DME programming with. It can be done, though. I recall a 6-speed E38 750iL project by Koala Motorsport and as far as I know they used the original DME. You may want to get in touch with them.

    No affiliation but collectors of scale models or anything E31 related might be interested: Exactly one year after the 850CSi, France-based OttOmobile will release a 1:18 scale model of the Alpina B12 5.7 Coupe in June.


    Alpina B12 5.7 Coupe 1:18 scale model by OttOmobile


    Since this model will most likely share molds with last year's 850CSi, see the 850CSi scale model thread for more information about OttOmobile, user pictures, build quality and detail,...


    The Alpina B12 5.7 Coupe will be produced in a limited run of only 2000 units. Preorders can be made on the OttOmobile website and will start shipping somewhere in June. The price for the scale model is 59,90 EUR and shipping to France costs 9 EUR, the rest of Europe 18 EUR, and worldwide 39 EUR.


    Pictures:


    Sorry for the late reply - I don't check this section very often...


    Carsoft is a waste of both time and money. With the exception of very expensive tools like Autologic, third party diagnostic tools usually perform very poorly in comparison to the dealer and factory tools (DIS, INPA and ISTA/D).


    INPA is fast and makes an excellent quick fault code reader and diagnostic tool. DIS on the other hand tends to be slow, but it often provides a wealth of additional information and test plans that are not present in INPA which make DIS the preferred tool for in-depth diagnostics and troubleshooting. INPA is part of the Ediabas / Standard Tools software suite (along with NCS Expert and ToolSet 32) and runs on 32-bit Windows only (newer versions are compatible with 64-bit operating systems but do not work with older cars like the E31). DIS is UNIX software and cannot be installed in Windows. You can either run it in a virtual machine (from within Windows) or natively on compatible hardware (IBM T30 and similar). The native install provides the best performance but you have to dedicate a machine to DIS. With a virtualized DIS you can switch back to Windows on-the-fly to use other tools, browse the web, read PDF documents,... The flexibility is much greater but because there are no virtualization drivers for DIS, the performance will be quite poor unless you run it on relatively powerful hardware and perform some tricks. DIS is no longer used by BMW dealers and has been replaced by the newer ISTA/D diagnostic software. ISTA/D contains everything DIS had and supports up to the newest BMW vehicles. ISTA/D can be installed on 32-bit and 64-bit Windows but likes a powerful CPU and lots of RAM.


    One important note about INPA is that it cannot diagnose the E31 EKM module (there seems to be a bug in the data files supplied with INPA) and it can also not diagnose the M70 DME module. Modified data files are available to fix the latter (link).


    But just the software is not enough. You also need an interface to connect your car to the diagnostic system. For the E31 you have following interface options:


    • ADS: Reliable and low-cost but requires a true RS-232 serial port in your computer. Limited number of supported BMW models (but that doesn't matter if you're only interested in the E31). Slightly more expensive are ADS/OBD combination interfaces which provide support for more vehicles. The interface works natively with INPA and can be made to work with DIS as well (does not work with ISTA/D).
    • EDIC (also known as DK, GT1 or "yellow head"): Native interface for DIS but can be made to work with INPA as well (does not work with ISTA/D). Wide(r) support of BMW vehicles without having to switch between ADS and OBD interface modes. Genuine yellow heads are relatively rare and fetch premium prices. Chinese knock-offs are much cheaper (although still much more expensive than ADS interfaces) but may have reliability issues. There used to be great Chinese clones but in recent years the quality seems to have plummeted. I would only recommend a Chinese clone if you can return it easily for a refund, or if you can get a used one that is known to be working reliably on the E31.
    • ICOM A+C: Native interface for ISTA/D but can be made to work with INPA (and in theory with DIS but since ISTA/D contains everything DIS had there is not much sense in doing so). Once again available genuinely for steep prices, or somewhat cheaper as a Chinese clone. In combination with the ISTA/D diagnostic software, you should be able to diagnose the entire range of BMW vehicles. The Chinese clones seem to work quite well on modern bimmers but I experienced annoying disconnection issues on the E31: After a while communication between ISTA/D and the E31 halts and the only way to restore it is to close and reopen ISTA/D and power cycle the ICOM interface. This does not occur with a genuine ICOM interface. So just as with the EDIC I would avoid a Chinese clone unless you can return it easily for a refund or get a system that is proven to work reliably.


    A popular combination for the E31 is a laptop running Windows XP and Ediabas/INPA along with a virtual machine running EasyDIS v44 and an ADS interface. Installing Ediabas/INPA and EasyDIS can be difficult if you are not computer savvy, so some people offer complete packages that work out of the box (laptop + pre-configured software + interface). Not the cheapest solution, but it works and gives you the best diagnostic functionality for the E31.


    Please note that not all modules in the E31 offer the same level of diagnostic functionality. The E31 was the first BMW vehicle to offer advanced diagnostics but compared to modern cars the amount of information that can be retrieved from the car is not that great. Don't expect diagnostics to be the answer to all problems. Diagnostics can be invaluable in troubleshooting so it's definitely worthwhile to at least read the fault codes for any issue you may experience, but it's not uncommon no fault codes are stored and the diagnostic functionality may not provide enough detail to identify the problem. In some cases the fault codes may even point you completely in the wrong direction!

    Wildatheart: In that case it might be a short circuit after all. Disconnect one of the headlights (just behind the headlight pod and towards the edge of the engine compartment are two round connectors close to each other - disconnect both). Wait for the problem to return. If it does not, the problem is most likely in the disconnected pod. If it returns, reconnect the headlights, disconnect the other side and wait again. Is the issue gone, the problem is most likely in the disconnected pod. If it still returns, the problem must be higher up. Reconnect the headlights and now disconnect the headlight alignment switch in the dashboard. If the problem is still there; the issue must be on the wiring between the switch and the headlights. If the problem is gone it's most likely the switch itself (it's rather unlikely the problem is even further up).


    I agree with Steve: Using a larger fuse is a risk with the wiring. The continuous activation may also cause overheating and damage to the headlight adjustment motors. Try to find the cause as soon as possible.

    In my opinion it's unlikely (but not impossible) both adjustment motors broke at the same moment. If the electrical troubleshooting manual (ETM) is correct only a single wire leaves the headlight adjustment knob. So if both headlights do not behave exactly the same the fault cannot be higher up than the wiring towards the adjustment motors. But a short in the wiring, no matter how likely with the crappy wiring around the headlights, does not really sound plausible to me. At least not on the wiring that leaves the headlight pod: The headlight adjustment signal that enters the driver's pod is on the same wire as that of the passenger's pod. If there's a short to that wire in even only one of both headlight pods, both adjustment motors should act the same. Maybe bad contact? Confusing :hmmmm:...


    Does the problem also occur when you set & leave the headlight alignment at maximum drop?

    Zitat von reinhard;127562

    I´d expect that the basic set of speakers (footwell, rear parcel shelf & (maybe not complete) doors) has been installed along with the wiring going to the speakers. There won´t be an amplifier in the boot and consequently no wiring loom leading to and fro. The speaker setup will be even more basic than what came optioned as S676. The ones under the rear parcel shelf are just a single chassis and IIRC the same holds true for the door setup.


    That's right. No boot amplifier and only 6 speakers (of which none are the same as the hifi system).


    Stereo system


    • Footwells: 2 x 25 W woofer
    • Doors: 2 x tweeter (unknown wattage)
    • Rear parcel shelf: 2 x 25 W woofer


    Hifi system (order option 676)


    • Footwells: 2 x 40 W woofer with bass reflex enclosure
    • Doors: 2 x 15 W mid-range + 2 x tweeter (unknown wattage)
    • Rear parcel shelf: 2 x 40 W woofer with bass reflex enclosure + 2 x 15 W mid-range + 2 x tweeter (unknown wattage)
    • Boot amplifier: 4 x 25 W (up to September 1993) or 10 x 25 W (from September 1993)


    All speakers have 4 ohm impedance. The power ratings of the amplifiers vary from source to source (4x15 to 4x25 W for the early system and 10x20 to 10x25 W for the later system) and should be taken with a grain of salt.

    user2883: I'm not really familiar with order option 687 but since there's a separate order code for CD changer preparation (694), I assume the CD changer wiring is not included with 687.


    Anyway, the CD43 has a built-in CD player. Unless you don't like swapping discs frequently you don't need the CD changer. If you want more music I would recommend to look into hooking up an MP3 player to the CD43. If you are really determined to get the CD changer, make sure you get a cable and CD changer that is compatible with the CD43. BMW used various CD changers with different cables over the years which are not exchangeable. Note that in order to mount the CD changer in the trunk you may need additional mounting parts, a different floor mat and side trim.

    OEM head units use a different connector from aftermarket head units:


    • OEM: Proprietary 17-pin connector with round pins
    • Aftermarket: Two 8-pin ISO connectors (usually)


    But don't worry: there's probably a BMW-to-ISO adapter cable installed in your car. Just remove the adapter cable to install an OEM head unit.


    During the 10 years of production, BMW used a fair amount of different head units in the E31. Reinhard posted a great overview but the thread is only accessible to supporting members (and it's in German). Most OEM head units are not worth looking at other than nostalgia. Sound quality is poor and many are plain ugly. In my opinion there are only 2 OEM head units worth of installing if you care a bit about looks and sound quality (and plug-and-play compatibility):


    BMW Business CD


    Type: Radio CD player
    Manufacturer: Blaupunkt
    Model: CD43
    Original BMW order option: 658 (note this code was used for various head units in the E31)


    (picture taken from reinhard's post)


    Introduced close to the end of production the BMW Business CD is nowadays one of the most sought-after OEM head units for the E31. Its sleek design, modern CD player (most head units had cassette players), and excellent sound quality make it a very desirable choice for OEM-fetishists. Through aftermarket interfaces it's even possible to hook up mp3 players that you can operate from the head unit (although it's best to read up about it because there can be quirks with some models).


    The BMW Business CD is almost always referred to by its Blaupunkt models number: CD43. Please note that the head unit was also manufactured for the Rover brand. You will find a lot of CD43 for sale with a BMW ///M logo right from the volume knob. That's actually a decal covering the Rover logo. Genuine BMW head units have "BMW BUSINESS CD" printed there instead. Other than the decal the head units are identical.


    BMW Professional RDS


    Type: Radio cassette player
    Manufacturer: Becker
    Model: BE2450
    Original BMW order option: 670


    (picture taken from reinhard's post)


    The top model head unit starting from 1995. Excellent sound quality, trademark dual tuners, gorgeous large display, but the cassette player makes it look a bit dated. It was meant to be combined with a trunk-mounted 6-disc CD changer. If you intend to replace the CD changer with an MP3 player you are better off with the CD43: Despite the nice and large display, the BMW Professional RDS cannot display text submitted over its CD changer interface which really limits the usability with MP3 players.

    Mine arrived as well!


    First impressions: Some of the detail is really amazing. For example; you can acually read AIRBAG SRS and recognize the embossed BMW logo on the M-Technic steering wheel. I also like the lenses of the tail and headlights - very detailed and nice depth. The center console on the other hand is sculpted a bit rough. The roller wheels of the center vent and climate control unit are barely recognizable. Then again, these details are very, very small. Given the size and the price of the model I guess this is the best we should expect. Despite that it is far better than anything else available. The Revell 850CSi and Maisto 850i models look like junk in comparison. I'm really happy with the OttOmobile 850CSi!


    A few factual errors:


    • 5-speed gearbox instead of a 6-speed gearbox (take a close look at the shift lever in my interior picture)
    • Brake discs way too large and calipers do not resemble the real deal
    • Side windows are flat instead of curved
    • No third brake light (not all early E31 had a third brake light but I believe all later models did)
    • Driver and passenger side mirror have the same dimensions and angle
    • Bottom side is clearly not meant to be looked at
    • Rear-view mirror is attached to the roof instead of the window
    • No staggered wheels and tires a bit stretched


    According to Reinhard the model does not depict an actual E31. OttOmobile just picked a nice color combination and wheels. Nevertheless, the chrome inner door handles and belt guides, the rear-view mirror and the fact that there's no passenger-side door lock, puts the model somewhere between January 1995 and April 1996.

    Mike: It does already show up on eBay and I guess some of the scale model shops also secured a small supply, so you can still get it. The bad news is that prices (at least on eBay) are almost double what we paid during the pre-order campaign...

    OttOmobile sold more 850CSis than BMW did ;)


    Anyway, it's good to see there's so much interest in the 850CSi scale model. It seems we are not the only ones appreciating the E31. I hope this inspires OttOmobile to do an Alpina B12 5.7 Coupé one day... And perhaps a regular 8 Series without CSi bodykit just to get the family complete.