Beiträge von wpo750

    Zitat von Paul_M;50782

    Cheers guys, ordered a pair last night. Can't lose at that price!


    Job38, yes they are a straight swap with the addition of a resistor in parallel on each side. The resistor needs to consume the same power as the original bulb, which is 5W. So V^2/P is 144/5=28.8 ohms. You won't get a resistor in this exact value, so go for the next value up (probably 33 ohms) and you'll be fine. Make sure it can handle over 5 Watts of power dissipation, personally I'd go for 10W resistors to be safe, and make sure they're well vented to dissipate the heat.


    OK I'm joining the £12 LED club but as an electrical numpty I have no idea how to wire in the resistor. Can someone enlighten me as to how and where one should wire in the pair of resistors? If anyone has any pictures of the process they could post up that would be even better!

    I was furious with the dealer when I got down there as I'd spent plenty of time on the phone to him confirming the condition of the car as I wanted to be sure the car stood up to its description. A complete waste of my time and a £60 round trip.


    The overly contrasted images serve to hide a multitude of sins and I should have known better. From the pics it looks very attractive (although in the flesh it is much more of a green than the Atlantis Blue it tries to be) and the spec is high but it's just not a genuine car.

    I made the trip to see this car a couple of months ago and it's a complete dog! Such a shame as it does indeed look promising on paper and a check on it's history showed that it had a very comprehensive history with main dealers (30 odd stamps iirc). However, I can only assume that in recent times it has fallen into the wrong hands and since the end of last year it has been subject to severe neglect and possible damage.


    Every panel on this car shows either dents or deep scratches, there is evidence of some very shoddy paint work across most panels with lifting lacquer from the window seals. The boot lid didn't sit flush either which corresponded to the awful paint work on the NSR suggesting that it's had a shunt of some kind. It has definitely had a knock on the front and the front plate holder was found in the boot, broken. The rear screen has been vandalised where someone has etched some writing into it.


    The interior has missing pieces of trim from the front console and the ash try is broken but apart from that it seemed ok. The electric steering column did seem slightly erratic though. AC doesn't work and I suspect a new pusher fan is needed.


    To be fair the car seemed to drive OK but I was reluctant to develop any kind of kinship with the vehicle in fear of it becoming a mercy purchase. I've 'rescued' cars in the past but didn't fancy the impending £2.5k this would need to make it a respectable car.


    Unless the 'dealer' (note many crashed/damaged cars that sit in his lot) has taken my recommendation of tidying this car up and/or dropping the price considerably, I'd walk away from even the thought of going to see this car as it will only serve to upset any E31 enthusiast.

    OK, my ‘rattly clink’ has been resolved and I have to admit that plugging in both rear seat belts did the trick. TerryY was on the ball! The rear belt unit seems to be very sensitive and with even the slightest tug on the belt causes the mechanism to ‘clink’ and I can only assume that it’s the looseness of the unit that makes itself apparent especially on uneven road.


    The problem is I don't like the way it looks so I will be striping down the belt assembly at some point to see if I can tighten things up a tad.

    Zitat von Steve5;49116

    Yea I've got it on mine sounds just like a squeak/ rattle will look at the amp bracket, but definately coming from the parcel shelf area!!!!


    That sounds familiar. I've checked out the amp bracket, all fine. Tried the seatbelt trick, no change. As said it's definitely coming from the parcel shelf area possibly biased to the the passenger side (LH).


    @ Steve5 - Do you have the electric rear blind on yours?

    Zitat von hallworth1

    Not so much a "clink/rattle" more of a rattle/clink on mine, turned out to be the bracket that holds the amp in place.worth a look.


    Haven't checked that! On the case :D

    I suffer from 'in cabin OCD' and will go well out of my way in eliminating any noises emanating from interior trim but I'm having real troubles locating the latest 'clink' which sounds as if it's coming from the rear.


    I'm wondering if this is a common noise as it has been reported by another fellow 8 owner and he too has no idea where it's coming from. The 'clink/rattle' seems to be apparent when driving over imperfect roads and it's coming from the parcel shelf area. At first I thought it was the rear seat not fully clicked back into place but both are firmly clicked into position.


    Has anyone else encountered this, if so what is it???

    The tyres were Michelin Pilot SX something and although very decent tyres they don't have what I'd consider to be an 'attractive' tread pattern. I agree that if 275/35R were available they would have looked much better as the profile of the tyre looked very large due to the deep tread design. Regardless, 265/40R keeps things OEM on the 9J RC rim and it does look 'just right'.

    Zitat von 8Tech

    No, 275's will be ok on a 9J rim but go no further than this. 235's are way too narrow for the 9J.
    I think someone was trying to save a few bob!


    8Tech


    I popped down to the local tyre shop today and got them to try a 275 on the 9j and it looked horrible! No rubbing issues but aesthetically unacceptable. As luck would have it they found a pair of 265/40r 17 Continental Contact sports and they look spot on. Ride quality had greatly improved too!

    Hello all, my rear rims are 9J and the previous owner had 235s fitted on them and whilst the slightly stretched look is neat on crazy wide rims, it does nothing for the stance of the 8 series rolling on 9Js at the rear. From factory I believe they were fitted with 265/40/17s and I'd like to go OEM but my local tyre place has none in stock. I'm being offered 255/40 Conti Contact sports or 275/40 Michelin Pilots. I want to beef up the stance from the rear and I'm inclined to go for the 275s but will they take over a 9J rim?


    Input appreciated!

    Zitat von 8Tech

    They look fantastic. You will need to protect those bare alloy rims though or you will experience severe corrosion to the bare alloy from brake dust.


    Waxed and sealed! Weekly applications are in order as are a set of winter rims I guess...

    It is labour intensive and having experienced it first hand I now realise why so many companies refuse to refurb split rims properly. Having said that I reckon it should take no more than 4 hours per rim once you've in the swing of things.


    Zitat von Paul_M

    Forgot to ask, where did you get the socket for removing the nuts from the inside of the wheel? Apparently they're some unique "double hex" head or something similar.


    10mm multi fit socket on an extension. My Crescent kit (Costco bargain) already had everything I required.

    Thanks guys, I can't say I'm blessed with time either but I wasn't expecting it to take so long! To be fair I've done the worse effected rims so only the 2 fronts left to do which shouldn't be as difficult, plus there's less dish to polish!


    I aim to have it all completed with another 8 hours worth of labour and it won't be for a couple of weeks yet as the car is booked in for a full exterior detail next weekend. Just as well as I don't think my body can handle it :lol:

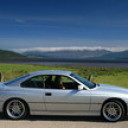
    The BBS Style 5s on my 840 sport aren't in the best of shape as they're suffering from lacquer peel, corrosion and kerb rash. Initially I was planning on buying another set of wheels to run whilst I refurb the splitties but if I had another set on the car laziness could get the better of me and they could well be shelved onto the long term 'to-do' list. I didn't want a lacquered finish on the dishes so I bought a set of polishing wheels and goblets and decided that I'd do them one by one and see how far I'd get on a weekend.


    I almost wish I hadn't started this project by Saturday afternoon but once you've started...

    Saturday 28th June - Start time 11:30am


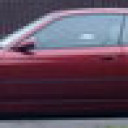
    I decided to begin with the worst one of the four (NSR) thinking that no matter how lame my attempt it couldn't possibly look any worse. As you can see it's in a pretty bad state with some deep gouges amongst the kerb rash.


    There are 34 bolts in each rim. Hard work and killer on the joints but luckily none of them were seized and all the nuts came off with a little persuasion.


    Once the nuts were all undone I expected the bolts to come straight out but they all needed a bash with a mallet as they were all seated quite tight.
    All present and accounted for.


    Having never split wheels before I wasted a lot of time being over cautious and light handed in my technique. After jumping up and down on the wheel centre for 5 minutes I found a 3 ft long piece of 2 x2 and wrapped one end of it with a towel, positioned it on the edge of the wheel centre and attacked the other end with the mallet. Winner.


    I opted to clean the bolts with a wire brush to strip off old lacquer, Hammerite, rust and whatever else was caked on them. 34 bolts later the RSI had kicked in.


    The wheel centres are all in good shape so no work required on that front. I decided to mask off the tyre as I didn't fancy getting paint stripper on the rubber but first I had to resort to barbecue cleaner to get rid of all the tyre shine in order for the tape to adhere.


    Opted for Nitromors as weapon of choice to attack the lacquer. Dabbed a liberal amount on all the lacquered areas and left for about 10 minutes whilst I cracked on with the wire brushing of bolts.


    It will need attacking again with the paint stripper and this time I applied it with more force and a jabbing action which released the majority of the clear coat. Repeat process until happy.


    Once all the bolts were cleaned up I found a cardboard box and drilled a succession of 7mm holes for the bolts to sit in. This would enable me to get decent coverage on the bolt heads with the Hammerite smooth.


    Then the wet sanding begins, joy of joys. The heavy kerbing required drastic measures to smooth out and I struggled to make any progress with my assortment of wet & dry paper. I took a small section of 40 grit (would recommend using something slightly less abrasive!!!) and worked away at the gouges then switched to various grades of finer paper to achieve an acceptable finish.


    It took ages to get rid of the self inflicted sanding marks from my overzealous coarse grain and I should have put more elbow into it but I was starting ache and I'd already been at it for over 6 hours so I moved onto the polishing wheel and compound.


    Paying particular attention to the bolt line as it will be easy to come back to the dish at a later date. A few coats of wax later...


    Then it was time to reacquainted with the Crescent wrench as reassembly begins. I was completely knackered by this point and wasn't even that happy with the finish that had been achieved but at least it was coming together.


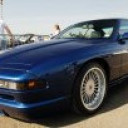
    And here it is back on the car.


    Finish time 8:15pm


    Despite suffering from what felt like sun stroke I dragged myself over to my parents house on Sunday to start on the OSR wheel and having started at 12 noon I managed to wrap up just before 5pm. This rim wasn't in as bad a state but having done it once already the method was fresh in my head and everything felt more efficient. 2 down, 2 to go. :D

    Zitat von wayneblackwell1000

    Yeah it was a PITA but they do go


    How did you manage it without snapping the bulb in the process??? Perhaps your bulbs are shorter than mine? I really cannot see how they will line up with the socket unless I hack a section out of the rear of the headlamp unit. I've ordered a new set of HIDs today anyway as my kit has a faulty ballast (plus they're getting on a bit), hopefully the new kit will be a little more forgiving...

    Zitat von wayneblackwell1000

    Nice one mate, beautiful colour, have a search on fitting HID's there's plenty on info on here.


    Cheers, I've done all the reading I can on fitting HIDs and I tried to fit a set yesterday but I couldn't even get the bulbs into the socket as they're longer and the back end of the HID bulb fouls the headlamp casing!? How did all you guys manage to get them in???

    Thanks for the comments guys! Life in the 8 is living up to expectation 8)


    @ Jud - That's really good to hear! Third last RHD e31 ever to roll off the production line, I feel honored :lol:


    I started my registration for 8coupe.com but I'll complete it in the morning as I don't have the VIN number to hand, look forward to seeing the build sheet, thanks! :wink:


    That's great, I will crack on with that asap. Thanks!

    So this is what I acquired last week and has been the focus of my attention over the weekend.


    1999 840ci Sport Individual - Royal Red with piped Champagne nappa interior.
    <center>


    </center>
    I'm really please with it so far and I still have to attend to some driver seat issues but I'm pretty certain I can resolve them without too much drama. The front bumper has had a blowover at some point and the colour match isn't great so I'm going to have that redone at some point (also has some stress cracks in the paint around the roundel).


    I was going to fit a set of HIDs yesterday but for the life of me I couldn't work out how to access the headlamp unit! :oops: I got as far as raising the haedlamps with the lights off but I couldn't work out what to do next...