So here we have a procedure to cover a whole number of tasks on the rear of the car.
The reason for the removal in this case was to replace a leaking brake pipe and handbrake cables, but could equally be replacing the subframe bushes or differential removal.
So here we brought the car into the workshop and first job was to remove the exhaust for access.....

We then disconnect the rear caliper flexi hoses on both sides from the rigid pipes on the chassis here.....

Then, by locking the propshaft, seen here using a chain wrench, we undo the diff input bolts and tap out the studs.....

Here you can see the problem with this car. It would appear that at some stage, the car has been jacked-up on a subframe washer, has then slipped off and bent the brake hose so it rubs on the fuel tank.

Here we can see that this car has clearly had an aftermarket catalytic converter installed on one bank.

We now need to disconnect the front mountings of the rear trailing arms,

seen here in the advanced stages of coming adrift from the pins and mounts.


With the heatshield above the propshaft removed, you can see where the 2 handbrake cables exit the floor of the vehicle....

swing under the driveshafts....

and enter the rear of the drum backplate.

Next job in removal of the subframe is to disconnect the ABS, rear brake pad looms......

and the speedo sender connector in the back of the diff.
Now, working from inside the trunk, behind the side trim carpets, disconnect the rear strut upper mounts.....

allowing the strut to drop down.

Then loosen the front subframe main bolts.....


and the rear subframe monuts. It can clearly be seen here just how much fun this is!!!!!


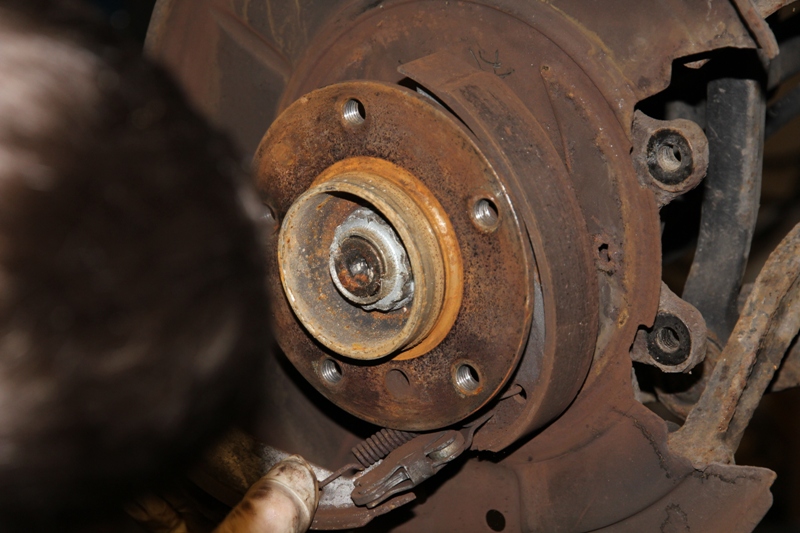
Here we see how the previous technician had decided not to refit the securing screw in the disc.....

or even bother to remove the broken thread of it from the hub flange. (We however decided to do this for the excitement of the day.)
Next, remove the brake caliper by removing the 2x 7mm hex head socket screws and lifting it away....

followed by removal of the 2 bolts retaining the caliper mount. Here we are cleaning off the corrosion to allow smooth fitment and operation of the pads in the sliders of the mount.

The discs can now be tapped with a mallet to free them from the hub flange and lifted clear to expose the handbrake shoes. Or as in this case, the backplate bent by the previous installer who left it as such so the disc rubbed on it, seen here at around 7 to 8 O'clock.....

Now, removing the handbrake gaiter from inside the car, remove completely, the 2 nuts on each cable to allow the cables to be pulled through the floor of the car as the subframe is removed. From under the car pull the cables through the floor and from out of the plastic clips on the underside of the car.
As these cables are to be replaced anyway, we need to completely strip out the rear handbrakes.
Replacing the shoes is a pretty straightforward job. With the disc/drum removed as described earlier......with a screwdriver, lift out the adjuster....

and using a hex key, remove the hold down springs by pussing in and turning a quarter turn in either direction. The push the tops of the shoes together and remove the top spring.

The shoes will now be all loose and so you can now remove the lower spring and lift off the shoes, exposing the small handbrake mechanism....
or alternatively, swing the shoes around the outside of the flange with the spring still attached and then remove from the mechanism.

The handbrake cable comes through the backplate and is attached to the mechanism with a small easy to lose pin which when removed, allows the small mechanism to be removed leaving the handbrake cable exposed.


Here we see how our previous "BMW Specialist" fitted the completely wrong handbrake cable, explaining the failure of the statutory test. New BMW cable on the left, existing cable on the right.

There now lies the task of removing the extremely corroded handbrake cable from the hub carrier and there is no subtle way of achieving this on a 15 year old car so......

followed by a cleaning of the hole with a small file.
"How To"....Remove the rear subframe.
-
-
Now, lowering the car down and supporting the subframe on a jack and stands, we can completely remove the subframe bolts and lift the car off the subframe.

O shock and surprise, a broken rear coil spring......

Which looks like its been that way for a while undetected.

The chafed hose and the consequencies can now clearly be seen.....

So with a few metres of brake line and some fittings, we get to work.....


Here the damage and tiny hole in the old line can be seen....

Here it is clear the impossibility of doing this with the subframe in......

We can now lower the car back down onto the subframe and get the 4 main mounting bolts started......

Lifting the car back up, we can feed in the floor heatshield.....

and lowering the nose of the diff slightly, re-position the propshaft into the drive flange and then tighten all 4 subframe mounting bolts.

Refit the exhaust........here the center mount has probably seen better days!

We can now reinstall the rear brakes.
Refit the small handbrake mechanism on the handbrake cable....

followed by one shoe and its hold-back spring....

and the bottom spring and the other shoe.....

Then the top spring......

and adjuster.....

Now using a screwdriver, turn the adjuster a few slots at a time.....

until the disc only just slides over the shoes but without binding.

The disc retaining screw can now BE FITTED.....

and the disc checked for free movement without binding. A tap with a mallet on the hub area of the disc will help centralise the shoes. The calipers can now be refitted with new pads, reattached to the brake pipes and bled.
Now refit the wheels, double check all the bolts and fixings, reinspect all hoses and cables are both reattached, routed and clipped correctly and you are ready to go. -
What a fantastic write-up as usual! That is one seriously rusty car though! Has it stood for a period of time - the brakes had obviously been unused for a while?
-
 Gerry makes it look easy again
A tough job "only" to replace a brake line and handbrake wire (plus whatever came up en route).
Brake/Fuel lines - for whatever reason - are pretty much affordable through BMW. Saves some work bending generic ones in the right places.
Rust really makes a big difference on much of this - for some of the rear axle nuts we rather take the big 1" toolset plus handle extension

How much time did it take you to get all this done?
Thanks for the great write-up!
Cheers
Reinhard -
Zitat von anguswolfendale;106291
What a fantastic write-up as usual! That is one seriously rusty car though! Has it stood for a period of time - the brakes had obviously been unused for a while?
It is my car and before purchase it had been left unloved on a garage forecourt for about 6 months hence the rusty brake discs.
Not good for any car not least the series 8 so I had it trailed down to Gerry to have the know faults rectified and mot’d. When I get it back I need to do give it a good shakedown something I am very much looking forward to.Petrol prices are dropping so all I need is the sun to come out!

I will also post a write up on my experiences of buying the car but the best thing I did was to take it to Gerry at Phoenix Motorsport to fix the known faults.
Much of the work done has been to put things right as a result of bodges by previous owners or garages. For example, the reason the handbrake cables were being replaced is because in the past the cable must have failed and was replaced with the wrong part. The picture that Gerry has not shown is the one of the cable at the handbrake lever end. Instead of the adjuster the cable had been clamped with a ‘u’ bolt.
Anyway, the main reason for replying to the post was to thank Gerry, Timm and all the other regular contributors on this forum for all the great information. As a new owner I have found it invaluable and Gerry’s ‘How to’ posts are better than having a Haynes manual.
Phil
-
Zitat von reinhard;106293Alles anzeigen Gerry makes it look easy again
How much time did it take you to get all this done?
Reinhard
4 hours with no breaks and no stopping for pics.
-
Zitat von philR;106296
the reason the handbrake cables were being replaced is because in the past the cable must have failed and was replaced with the wrong part. The picture that Gerry has not shown is the one of the cable at the handbrake lever end. Instead of the adjuster the cable had been clamped with a ‘u’ bolt.
Phil
Here's that little gem that I was not going to mention, but seeing as Phil has......

8Tech. -
Fantastic work as usual Gerry.
What a complete bodge with that cable, I've seen it all now.
-
The cables used on my car were the last two in the uk so if anyone has a problem with their handbrake I have a 'u' clamp that they can have

Thanks to Gerry the handbrake is now fully working so to the garage that carried out the last repair

Phil
-
Zitat von 8Tech;106324
4 hours with no breaks and no stopping for pics.
 Only 4 hours
I wish you lived in Norway
Thats really impressive
Regards
Terje -
Ach come on, this is Gerry just pulling our legs
4 hrs on one day and all day the other oneWe once managed to pull out a rear axle in 2 hrs (2 people) but then (our method differs slightly as we take it apart on the fly), all of a sudden it became dark and we thought it dangerous to work under those conditions and rather resorted to drinking to make this darkness go away
Last rear axle took us 5 hrs to pull/dismantle, needed to employ angle grinder for one recalcitrant screw rusted tight in a ball bearing.
Anyway - Gerry did an excellent and amazingly speedy job there and also mastered other problem zones any other workshop either wouldn´t notice or just "forget" to fix or worse
It is good to know that Gerry is offering his expertise and labour to the UK 8er community - no idea what the hourly rates are but trust his hours are worth ten times what you´d pay at any given BMW workshop.
Cheers
Reinhard
Jetzt mitmachen!
Sie haben noch kein Benutzerkonto auf unserer Seite? Registrieren Sie sich kostenlos und nehmen Sie an unserer Community teil!