The LED THREAD for Exterior and Interior lighting

  • Not much activity in this thread lately... Here are a few teasers of what I did last week. For those who haven't been following this thread: I'm (very slowly) modifying the night illumination of certain instruments and controls in the E31 interior. It only takes a short glance at the interior at night to see BMW didn't put much effort in making all illumination equally bright and of the same color.


    This time I turned my attention to the onboard computer (OBC/MID). With the HVAC/IHKA control unit lighting tweaked, the center console buttons' illumination sorted out and the headunit heavily modified, only the OBC was left in the center console. Its buttons are illuminated too soft and uneven.


    The E31 OBC:


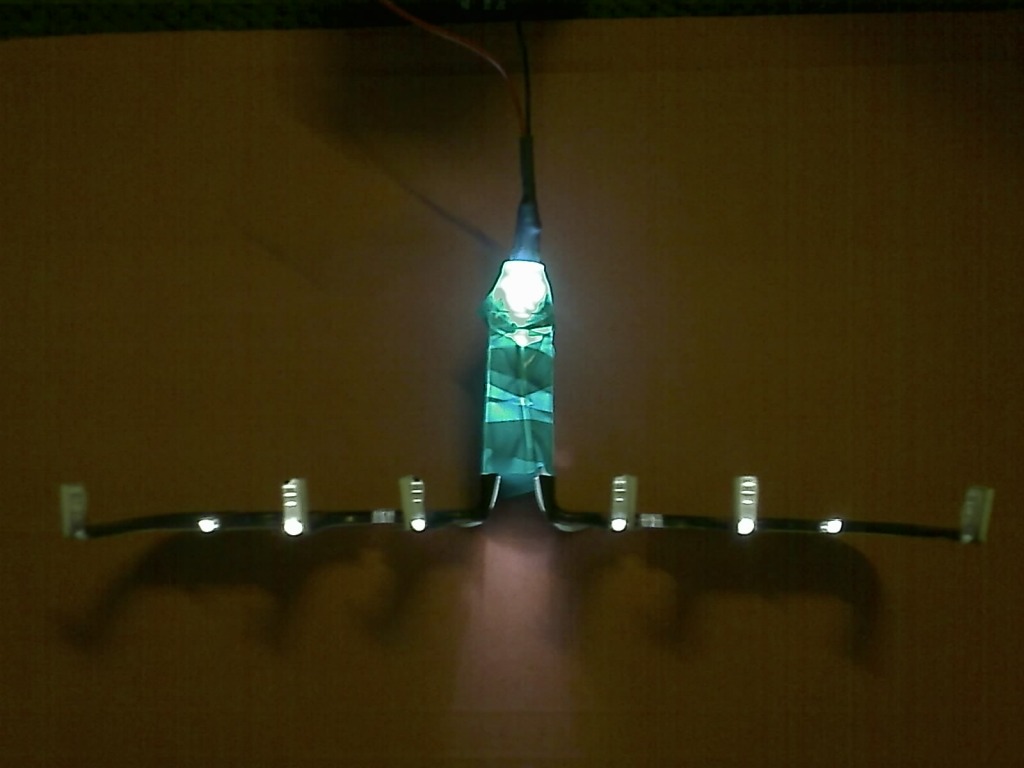
    After disassembly the unit reveals the illumination of the buttons. Just as with the roller wheels in the HVAC control unit, a light bar distributes the light. This one is better designed and lighted by 4 LEDs, but it's simply very difficult to get an even light distribution with such a construction. A better approach would be one or two micro SMT LEDs underneath each button. I didn't feel like changing the OBC radically so I opted to reuse the light bar but fix its flaws.


    In the picture above you see two of the four orange LEDs that light up the light bar. The two clear LEDs on the right are red status indicators (three in total for the CODE, TIMER and LIMIT buttons). In the HVAC control unit mod, I increased the brightness of the buttons a bit by increasing the current through the existing LEDs. However, measuring the current through the LEDs of the OBC showed 36 mA at 13.8 V which is already quite high. Knowing that most modern LEDs have a maximum current around 20 to 30 mA and without any specifications of the LEDs used in the OBC, it was a bit risky to increase the current even further. So the best bet was to replace the LEDs with brighter LEDs. It's not easy to find bright round 3 mm LEDs in BMW orange, so I used SMT LEDs:


    Avago Technologies HSML-A401-U40M1
    • Size: SMD PLCC-4 3.2mm
    • Colour: Orange 605nm
    • Viewing Angle: 120°
    • Intensity: 1260mcd
    • Current: 70mA
    • Voltage: 2.2V
    • Farnell Ordercode: 1058431


    Because I'm going for an "all orange" look, I also wanted to replace the three red status indicator LEDs. I chose to replace those with the orange LEDs I just replaced with the SMT versions. The current through the indicator LEDs is very low, so the relatively bright LEDs will have a comparable brightness as the current red LEDs.


    Now there's plenty of light, but if it's not spread evenly by the light bar the result will still be far from perfect. By lowering the current through the LEDs the shortcomings and faults in the light bar become very apparant:


    Worthless... But it can be fixed!


    First I determined the current through the LEDs at which the weakest button had the correct brightness (I always use the seat heating switch as a reference) - 15 mA at 13.8 V. A 270 ohm resistor (in series with the existing current-limiting resistor) pins the current at 15 mA.


    Then I used thin foil to darken all other buttons to the appropriate levels. For the parts that needed extra darkening, I used graphite (pencil). Several buttons had to divided in multiple zones to get the lighting even. This is not a pleasant job: Too dark, too bright, again,... It takes hours to get get it right.


    But the result pays off. In the picture below you see the OBC (top), headunit (middle) and HVAC control unit (bottom):


    The sharpening algorithm I apply to my pictures seems to cause a slight discoloration. Some elements appear more yellowish, others more pinkish. In reality the colors are all spot-on - all LEDs I use have exactly the same wavelength (color).


    This is a test setup on my desk, hence the displays remain dark. In-car it looks the same, but the E31 interior is not exactly friendly for a camera on a tripod :mrgreen:.


    The center console is now completely done. Still left to do: the switches left and right from the instrument cluster, the center vents, the window switches and the sunroof switch. However, at the rate I'm working right now this may still take a looong time :(

  • Zitat von Paul_M;70590

    Wow, phenomenal attention to detail! I presume you're a bit of a perfectionist? :D


    I may be guilty of that :mrgreen:. On the other hand... BMW should have gotten it right from the beginning - how hard can it be? Especially considering the car's original price tag...

  • Thanks for that excellent documentation and again for your inspiring modifications!


    Everyone considering to trace the steps of Revtor pls be advised that the connection between the LCD display and the PCB itself is fairly sensitive and easily broken. Being clumsy you might end up with an equally bright lit but non working MID ;)


    Zitat von "revtor"

    BMW should have gotten it right from the beginning ...Especially considering the car's original price tag...


    You´d be surprised how sharp the pencils were in the calculation of the car´s costs.
    In the movie "Testfahrt mit Tarnkappe" (Test drive under a magic cap) which was a documentation by the German television one can see Mr. Weissbarth, the project leader, haggle about the grand sum of 3.50 DM for noise insulation materials. That is 1.8 EUR or 1.65 GBP today and it was worth a discussion twenty yrs ago.


    See clip below - only German - sorry.


    Video (AVI) 10MB


    Cheers
    Reinhard

  • Zitat von reinhard;70606

    Everyone considering to trace the steps of Revtor pls be advised that the connection between the LCD display and the PCB itself is fairly sensitive and easily broken. Being clumsy you might end up with an equally bright lit but non working MID ;)

    The display itself is left untouched, but I agree you have to be very careful with it. It's known to be prone to failures, so avoid stress on the display at all cost - especially during dis/reassembly. Also pay attention not to make accidental scratches on the display while working on the mod. Another point of warning: The plastic light bar is very brittle. If you try to pull it straight up to get it off the keyboard you will very likely break the thin retaining tabs and there are only three. One broken tab isn't a problem, but with two or more broken tabs the bar is no longer held in place and may rattle while driving. The rest of the OBC is pretty much fool proof, though.


    Zitat

    You´d be surprised how sharp the pencils were in the calculation of the car´s costs. [..]

    Thanks for the video Reinhard! Of course I do realize BMW tries to cut the costs as much as possible - even on their flagships. The video shows just one item - sound isolation, but you can be pretty sure almost every other part in the car was treated similarly. I just think it's sad that BMW didn't pay attention to small details like this in a top end luxury coupé from that era.

  • Easy fix for the woeful lighting of the centre vent. Use a stronger light source.


    That is a very bright 265k LED with resistor to work directly off 12v+.

    Nice and clean looking. Cost about 40p.

    On my light bar, the outer left and right strips have developed a slight brown tinge, due to ageing of the plastic, and this inhibits the light travel to the outer bits, but anyone who hasn't got that problem will have even better results than this.

    I suspect wrapping the bar with reflective material will improve results. I will test that one day.

  • The same strategy could be used on the plastic light bar from the HVAC control unit, although it's a bit more difficult. You can't just have a LED shine down in the opening of the light bar - most of the light is lost that way. The light bar of the center vent is somewhat better suited for a LED.


    The problem I have with the plastic light bars is that they don't spread the light perfectly even. The longer bars are almost always darker and the shorter ones too bright. You may pump the overall brightness to acceptable levels, but you will not fix the inconsistency. The brighter the source light, the less apparant the brightness difference will be, but I don't want the instrument lighting to distract. I use the seat heating switch as reference for brightness and color. It's not very bright but it's bright enough to be clearly visible at night without distracting. My goal is not making everything more bright (although that's frequently necessary), but making everything equally bright and the same color. I'm probably too much of a perfectionist. Most people couldn't be bothered :mrgreen:.


    Coincidentially I made some progress on the center vent this weekend. I built a new light bar using a LED for each indicator - that's 9 in total. The wiring runs more or less the same as the original light bar. The plastic inserts are reused to prevent the wiring from blocking the vent mechanism. As usual I use orange LEDs so the blue "cold" indicator is barely visible. But nothing should stop you from using a white LED for the blue and red indicators. I do have an issue with light leakage though. Due to the location of the LEDs some light leaks through the roller wheel openings depending on their positions - annoying, but I'll fix it. That's probably not an issue when you use the original plastic light bar. The middle roller wheel is also a bit more difficult because it cannot be reached as easily as the others. For those who are interested in my version of the mod, I decided not to go with an adjustable brightness control, sorry. So if you build it exactly like mine you'll end up with my preferred brightness - not necessarily yours. Of course you could use the simple dimmer circuit from my HVAC control unit mod, but you'll need at least two, possibly more, because not all LEDs need equal brightness. Anyway, more info when it's done - whenever that is :).

  • Teaser pictures of the new LED light bar for the center vent - well a part of it. The LED for the middle roller wheel is still missing. Like I said it's in a difficult position. The light bar may seem a bit flimsy even fragile on the pictures, but it is to be mounted in the supports of the current plastic light bar. It doesn't need much strength or rigidity because it will follow the shape of these supports. You'll understand if you take the center vent out and look at its bottom. Nevertheless the light bar and especially the LEDs must be glued in place with small drops of, for example, hot glue - just to make sure everything stays in the correct location.


  • I installed the same LED bulbs as yours in the pic and I taped in the resistors as well but still get the"Parking Light Fail" OBC message. What the heck could I have done wrong? I also used the recommended 33 Ohm 5W as recommended per the formula in another post. The 22ohm 10W worked for you so do you think I should buy those and try?
    I have a 97 850 if that matters. Any thoughts on how to fix the OBC error would be helpful.
    I like how they match my HID's now.
    P.S. I had the same bulbs as in the pictures and one failed after about a week. Upgraded to SMD LED's with 102 little lights on each bulb. Much better.

  • If you have a spare resistor try temporarily wiring it in parallel with one of the existing ones. This will have the effect of lowering the resistance (parallel lowers, series increases).
    If this works it suggests that the previous failure was just due to variations within tolerance of the bulb failure unit. If not then I'm not sure.
    Be careful where you mount the resistors as they get very hot.

  • Thanks for the advice. It seemed to work at first to do two resistors, then error again. Got 10W 22 ohm resistors installed, same problem, 10W 100 ohm, same.. Once they warm up, they dont send error message but it was very annoying. My car must be finicky.
    After messing with it so much I finally just wired in the original bulbs, taped them up and tucked them away. Finally back to normal.
    On a side note, my first set of LEDs, half the LEDs burned out soon. The good ones are SMD LED's and are much brighter and dont look like they will fail .
    http://cgi.ebay.com/ws/eBayISA…&ssPageName=STRK:MEWAX:IT

Jetzt mitmachen!

Sie haben noch kein Benutzerkonto auf unserer Seite? Registrieren Sie sich kostenlos und nehmen Sie an unserer Community teil!