Looks nice Tony, I've not ordered yet ![]()
I now see your seats are in are they all sorted?

The LED THREAD for Exterior and Interior lighting
-
-
I also posted this at wuffer's board, but since other people are also contributing their HVAC illumination mods to this thread, I thought I'd share mine too. I haven't had the time yet to write and extensive article around it, but here are some teaser pictures with a word of explanation:

LED brightness adjustment - small and simple but very effective. I didn't want to mess with soldering different resistors or putting some filter over the LEDs to get matching brightness, so I opted to make it adjustable.

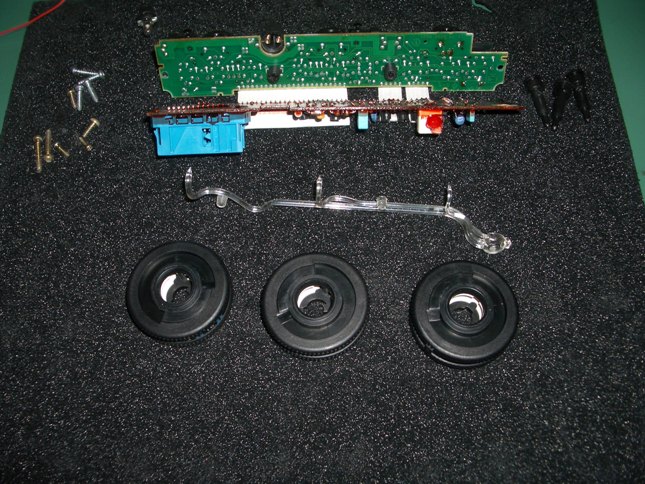
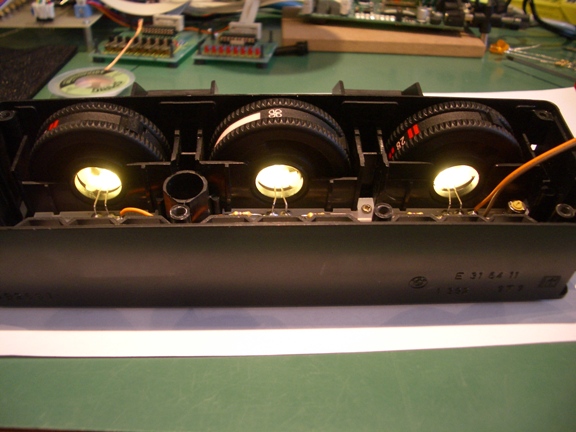
My lightbar replacement. Just like most I chose to get rid of the original lightbar. I didn't want to damage it - I always want to be able to get back to stock without too much effort - so I replaced it completely with LEDs shining directly in the roller wheels.

Close up of the LEDs. As you can see I opted for very small SMD LEDs. The SMD LEDs are quite dim (only 8mcd each), so I had to use 2 for each wheel. The combined 16mcd output may not seem very much to the overwhelming power of today's high efficiency LEDs which offer several thousands mcd. But the LEDs will be located inside the roller wheels shining towards the frontside, so the light distribution is very efficient. In other words, the LEDs don't have to be very bright. In fact, even this 16mcd had to be turned down a bit because it was too bright. The LEDs have a 170° viewing angle so the light distribution is very even.

The LEDs inside a roller wheel.

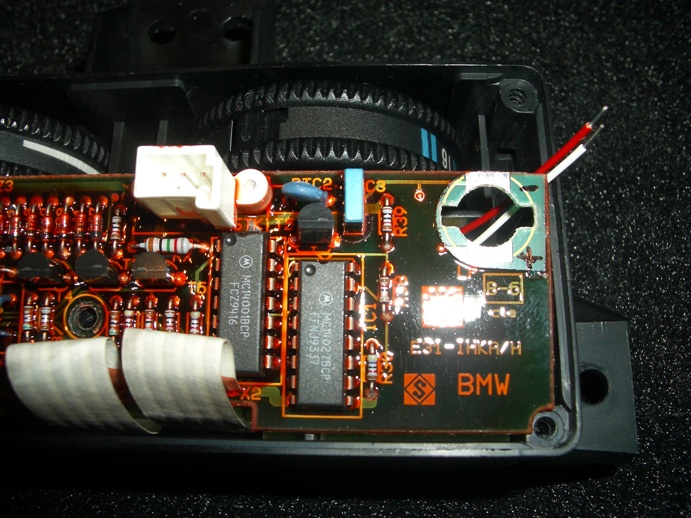
The LED lightbar and brightness control mounted inside the HVAC control unit. I used a hot glue gun to mount it the lightbar. I like thermoplast glues because they begin to fixate within minutes - no need to hold or clamp it for a long time. Also, the glue can be removed very easy once it has cooled down without leaving traces on the plastic.
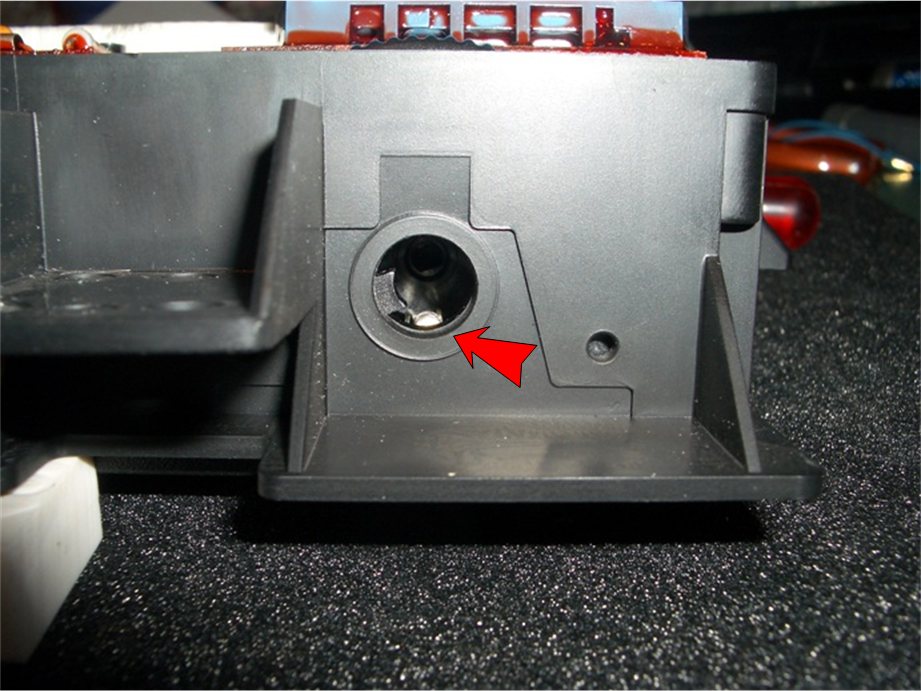
The brightness control is mounted with a small screw in a previously unused mounting hole near the location of the original lightbulb.

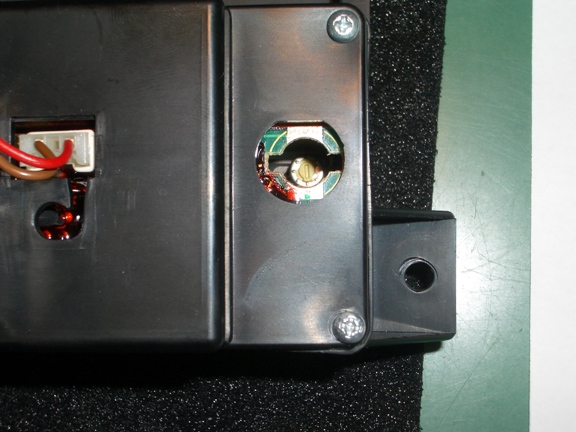
The brightness control is easily accessible through the lamp bulb hole in the back of the unit.

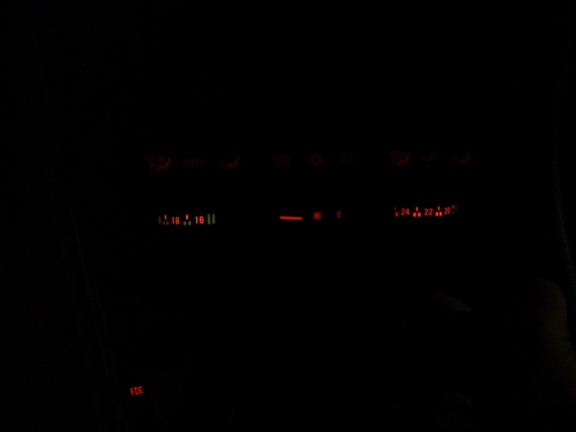
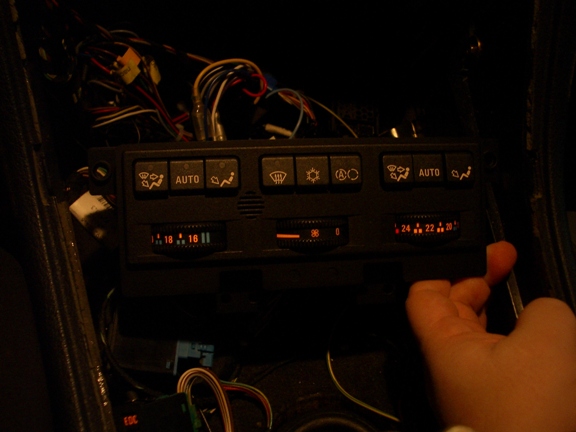
And this is what it looks like at night. The color matches perfectly with the illumination of the buttons. There's no visible difference in color or brightness between the original buttons and the "updated" roller wheels. I think the mod worked out very well.
If you want to match the BMW orange, you must use LEDs with a wavelength of 605-610nm. Anything shorter or longer will be too yellow or too red. The LEDs I used are 610nm. I didn't want to use white LEDs (like most people do). The white light tends to be too pale compared to the rest of the illumination. You can of course apply a color filter (orange paint for example), but why not using correct color matched LEDs from the beginning? As you may have seen in my Becker/BMW Radio Navigation Indianapolis display mod II perfection is the only thing I'll settle for and I go quite far in that :).
The only drawback of these orange LEDs is the monochromatic light they produce. Monochromatic light doesn't color well when a color filter is applied. You can see that clearly in the picture above. The red marks left from 24°C are almost the same color as the rest and the blue marks right from 20°C are nearly invisible. This works better with white LEDs, but I actually like the fact that it's all orange now. The red and blue just didn't match the illumination.
I also took the time to replace the yellow and green LEDs in the buttons with BMW orange LEDs (not seen on the picture above). Now the HVAC illumination is completely BMW orange - I like it
-
Very nicely done
-
Nice job although I will be going for the LED version like TT and Wayne.
-
Revtor,
Once again, very good work. You are a pro.
Tony,
Looks amazing! I especially like the lights in the doors. It must light the floor nicely when you want to get in.
Cheers, Peter
-
Revtor, I take my hat off to you. You are proof that 'in life there is always someone who is doing something better than that which you do yourself'....
I emailed Wuffer several times asking for details on the HVAC conversion, but never got any reply so I just had to do what I thought was right, I used prewired LEDs with resistors, so I can use the dimmer switch on the dash. It was just a bit of fun for me really, and nowhere near as professional as your version.
I cannot believe you had the patience to replace ALL the button LEDs

 The results are fantastic, but I'm a busy man who needs quick rewards
 Peter, Wayne, Dick and Lloyd, thanks for your comments. Despite the claims of LG about how good their new Viewty 5.0 MP camera-phone is, it really really isn't that great. The pics do show the improvement, but you really need to see it with your own eyes to appreciate the overall effect. (apart from Lloyd who has done similar).
Wayne, do not get me started on the seats. They are nearly 'ok', but they are booked in again to be corrected next month

Lloyd, I still haven't done the Map Readers yet, sorry. I know what I'm going to do, and how I'm going to do it, but I have been playing too much with the iDrive to sit down and do it ! For example, just taken delivery of '3 Mobile' broadband USB dongle today. Broadband internet in my car !!! It's madness
-
Zitat von TallTony
Wayne, do not get me started on the seats. They are nearly 'ok', but they are booked in again to be corrected next month I know exactly how you feel, remember I've been there, but enough was enough for me so had a full refund.
-
Zitat von TallTony
I emailed Wuffer several times asking for details on the HVAC conversion, but never got any reply so I just had to do what I thought was right, I used prewired LEDs with resistors, so I can use the dimmer switch on the dash. It was just a bit of fun for me really, and nowhere near as professional as your version.
Thanks for your kind words! As far as I understood, Wuffer took an other approach (I haven't seen his pictures either, but if you ask him at the board he'll send you the pictures). He cut off the bulb holder from the original lightbar and then attached 3 high brightness LEDs - one per bar. He also used white LEDs but with a small dab of orange model paint to colorize the light a bit.I didn't like the idea of cutting the original lightbar. After all, I always want to be able to get back to stock without too much effort - and of course without permanent damage. So just like many people I chose to have the LEDs shine directly into the roller wheels.
I prefer not to use LEDs with prewired resistors. I put a few LEDs in series with a single calculated resistor. More efficient and you have better control over the actual brightness. Add a simple brightness control and you can even adjust them between 0 and maximum brightness without effort.
The brigtness control gets its power from the original bulb socket. So the HVAC illumination still works fine with the dashboard dimmer switch.
ZitatI cannot believe you had the patience to replace ALL the button LEDs
The results are fantastic, but I'm a busy man who needs quick rewards
All the LEDs... It's not like there are many LEDs in the HVAC. I mean, the original button illumination LEDs are fine. They are correct BMW orange. Not too bright, but they match the OBC/MID and my radio mod. So these were left untouched. The only thing that bothered me about the buttons were the green and yellow status indicators (10 in total). Now these are BMW orange too and the result looks quite nice. Actually, it looks more stock than the originalNext on my list is the center vent illumination, but I have yet to figure out how to take that part out of the dash (I haven't really looked into it yet).
Other things that bother me are the difference in illumination brightness and color between the various buttons on the dashboard (lights, rear window heating,...). Also the buttons around the shifthandle are not all equally bright. This might be a bit more tricky to modify. The small PCB inside the buttons is not clicked or screwed in place, but with melted plastic dots. I need to find a good way to reattach it before I break this. Stupid cheap construction...
-
 Zitat von Revtor
All the LEDs... It's not like there are many LEDs in the HVAC. I mean, the original button illumination LEDs are fine. They are correct BMW orange. Not too bright, but they match the OBC/MID and my radio mod. So these were left untouched. The only thing that bothered me about the buttons were the green and yellow status indicators (10 in total). Now these are BMW orange too and the result looks quite nice. Actually, it looks more stock than the original
Next on my list is the center vent illumination, but I have yet to figure out how to take that part out of the dash (I haven't really looked into it yet).
Other things that bother me are the difference in illumination brightness and color between the various buttons on the dashboard (lights, rear window heating,...). Also the buttons around the shifthandle are not all equally bright. This might be a bit more tricky to modify. The small PCB inside the buttons is not clicked or screwed in place, but with melted plastic dots. I need to find a good way to reattach it before I break this. Stupid cheap construction...
I borrowed this image from Sama, since I thought you replaced every LED in the HVAC....

I just didnt have the correct bulbs in my spares box to tackle this job, so I didnt bother. The orange ones are too dim I admit, but since my HVAC is effectively hidden under my armrest now, or will be when I refit it, I didnt see the need to do it. One day maybe....
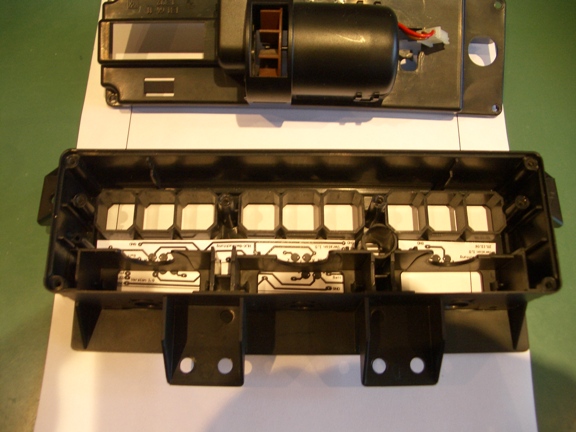
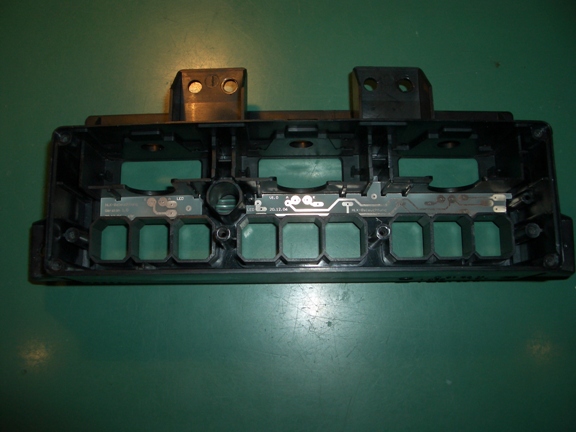
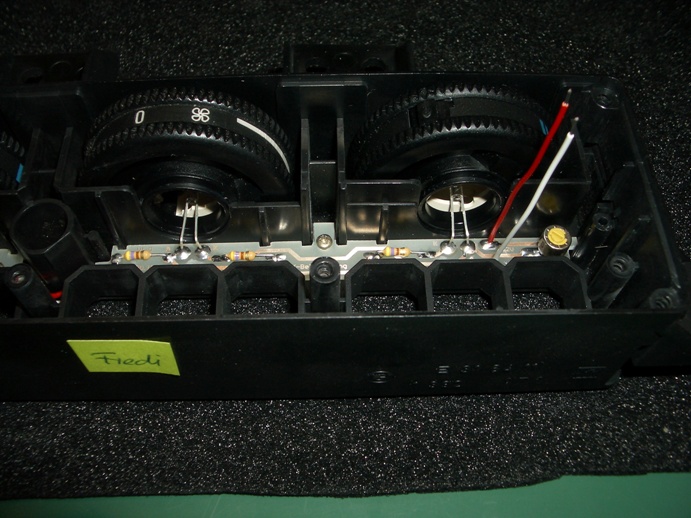
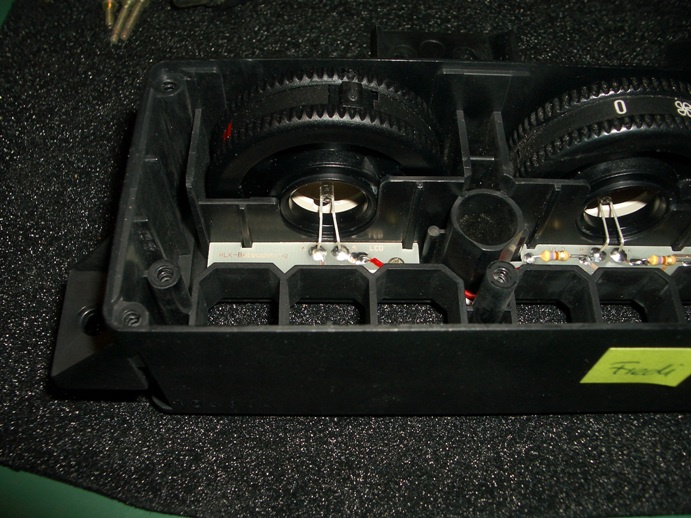
here is an image of the internals of a Heated Seat switch. I was experimenting with using one as a remote switch for peripherals in my car pc install, but havent cracked it yet. I did have to break those melted tabs off to get at it like you said, but I'm sure it could be reassembled and fixed in place easily with a bit of carefully applied glue.

Since my car doesnt have heated seats (or any other OEM extra for that matter) I was unaware that the switch is not a simple on/off rocker switch, and rather a 2 way push to momentarily make switch. I think I will probably just use the case and fit a microswitch from Maplin inside it.
I saw over on the other Forum you thought my interior light package was dimmer that Stock. Hopefully this image, not shot through the slightly tinted glass, but the door open, will convince you otherwise

I like how the sills are illuminated when the doors are open too
-
Zitat von TallTony
I borrowed this image from Sama, since I thought you replaced every LED in the HVAC....
No, I only replaced the top row (the button state indicators - 10 LEDs in total). The bottom row (9 LEDs) contains the button illumination - but these were already correct BMW orange. Their light ouput may not be that high, but it's more than enough in the dark. It's an almost perfect match with the MID/OBC and my modified Becker unit. So I left these untouched.Some may find the original LEDs too dim, but I don't mind. The buttons are very well readable in the dark. Brighter may become annoying for nightdriving on unlit roads.
Anyway, the bottom row LEDs aren't any harder to replace than the top row, but you must use LEDs with a very large viewing angle and an even light distribution. Otherwise the icons on the buttons will be well lit in the center, but dimmer or dark on the edges.
Thanks for the picture of the button internals! That gives me a good impression of what to expect.
ZitatI saw over on the other Forum you thought my interior light package was dimmer that Stock. Hopefully this image, not shot through the slightly tinted glass, but the door open, will convince you otherwise
It's very difficult to judge the brightness on a picture. It all depends on the exposure time by the camera. The picture below is shot at night with the camera on a tripod and a slightly longer exposure time than normal. This is stock lighting:
When I saw your pictures I immediatly compared them in my mind with my own pictures - like the one above. Now it's easy to understand why I thought yours was a lot dimmer than stock
-
Guy's, it's all to much.

How can I go to sleep tonight, knowing that there are 8's with so nice lights in it and I don't have the time to do something also with it at short notice.

Revtor is our own wizard, he will publish the whole process into our next clubmagazin, you can buy it......
But without the lol, it is from you both very impressive!!!!
-
There's a difference though, DickB. While I'm just fixing some minor issues BMW should have taken care of in the first place, people like "TallTony" and "sama" are really updating the car's interior with modern features like a carPC, cool white lighting, carbon fiber parts,... I try to keep as close as possible to the stock appearance, so these things are no option for me. But I like the car as it is - I'm not trying to hide it's a 15 years old design. I'm just taking care of some minor annoyances

Actually I like the idea of a carPC and I have been thinking along these lines too. But these things only work out well with a large screen and that would involve cutting the wood trim. Considering the prices BMW charges for a center console, that's completely out of question. My car is in great shape and I don't want to devalue it by irreversibly modifying stuff. Every change I make is well thought of and can easily be undone without leaving visible traces. A flip-out screen would be an option, but that doesn't look stock at all. So I burried the carPC idea and went with the Becker/BMW Indianapolis instead.
-
Here is an other modification with LED's on a print plate.
The first Layout
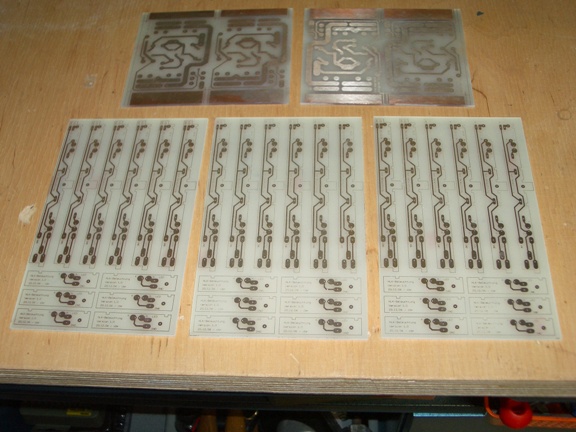
The production of the print plates.

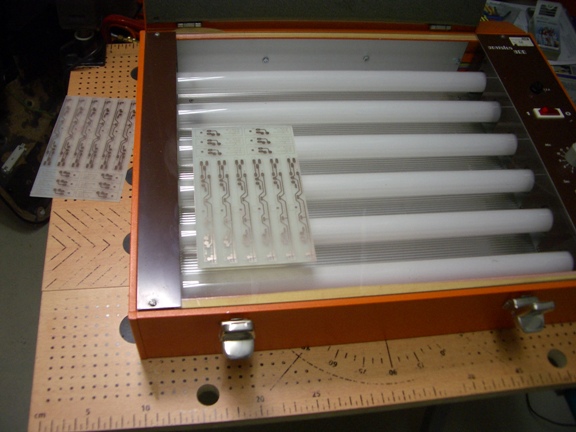
I need two days to finish a small serie of print plates.

You can adjust the brightness. Here with full brightness (1500 mcd).
You can buy this LED module for 35 Euro bye me.

http://www.8er.org/index.php?a…area_content&contentid=15
Greetings
Martin -
Very nice job martin! I like the idea of the PCB instead of glueing the LEDs. I had seen your mod before I started mine and I thought about manufacturing a PCB too. But by the time I could start designing the PCB, I already had a perfectly working lightbar made with some left-overs :D.
Btw, did you get my mail a few weeks ago? I wanted to inquire about the status of your OBC/MID mod.
-
Zitat von Revtor
Btw, did you get my mail a few weeks ago? I wanted to inquire about the status of your OBC/MID mod.
A few weeks ago, oohhh

I check my email again and give you an answer.
-
LED Bulb Replacement Definitive List
I have read through all of this thread with great interest and several times too, whilst attempting to make a list of the required replacement LED bulbs.
Although it seems 'done and dusted' and the thread has gone quiet since April 08, I cannot find any specific details for LED bulbs to replace the externals and also the details for the internals seem to have changed a few times.
Therefore, I thought it would be a good idea to make a definitive list of LED bulbs specs and types replacements with direct reference to the pages in the user manual.
Please could someone assist in filling in the LED bulb details. Many thanks.
Here are the relevant pages from the manual;


-
Zitat von TallTony;45951
here is an image of the internals of a Heated Seat switch. I was experimenting with using one as a remote switch for peripherals in my car pc install, but havent cracked it yet. I did have to break those melted tabs off to get at it like you said, but I'm sure it could be reassembled and fixed in place easily with a bit of carefully applied glue.
It's been half a year since you posted that image and over the last few weeks I finally found some time to take a closer look at the center console buttons' internals and do something on the inconsistent illumination.
I like the illumination of the seat heating buttons - perfect brightness and color. So I chose to leave both buttons untouched and use 'em as a reference for the other buttons. The worst illuminated buttons are the EML and ASC buttons. They are very soft and the color is too pale. The sunshade curtain button has the correct brightness, but its color is slightly off. Enough to annoy me :)...
I haven't disassembled the ASC button yet - it's of the same type as the seat heating buttons with melted tabs to keep its internals together. I'm waiting on a spare button to experiment with. The EML and sunshade curtain buttons are easy to disassembly, though. Here's what they look like:

The sunshade curtain button is illuminated by LEDs, but a different type from what I've seen elsewhere in the car. That might explain the slight color difference. The EML button is illuminated by an orange filament bulb.
I played a bit with the BMW orange LEDs from my HVAC/IHKA mod, but these were not bright enough to illuminate the EML button. The white lettering is quite thick and requires a lot of light. So I needed other LEDs...

From left to right:- Regular round 3mm LED
- Regular round 5mm LED
- Two of the small SMD LEDs I used in my HVAC/IHKA mod (*)
- Two of the new SMD LEDs. Actually two different ones with different brightness (** and ***)
- Two small circuit boards with each two LEDs on. These will replace the illumination inside the buttons
I case anyone is interested, I've listed the LEDs I use below. The brand may not be available were you live, but LEDs with similar specifications should be available from other brands too. These aren't standard LED types, so I doubt any electronic parts shop will carry them in stock but they should be able to order them. I got mine at Farnell - The Farnell order code is shown for each LED.
Avago Technologies HSMD-C170 (*)
- Size: SMD 0805 2mm
- Colour: Orange 605nm
- Viewing Angle: 170°
- Intensity: 8mcd
- Current: 20mA
- Voltage: 2.2V
- Farnell Ordercode: 5790864
Very small LEDs with an extremely large and very well spread viewing angle of 170°. The 8mcd intensity is low, but there are plenty applications were that should suffice. The advantage is of course in their size. You can put the LEDs in places where's almost no available space. The size is also the drawback. Without a good (fine) soldering iron and basic SMD soldering skills, they may get frustrating to work with.
Avago Technologies HSML-A101-S00J1 (**)
- Size: SMD PLCC-2 3.2mm
- Colour: Orange 605nm
- Viewing Angle: 120°
- Intensity: 220mcd
- Current: 20mA
- Voltage: 1.9V
- Farnell Ordercode: 1058397
In its largest dimension about the same size as a round 3mm LED, so still very small. The 120° viewing angle is very well spread, but not as wide as the HSMD-C170 LEDs. Still very good though. The intensity of 220mcd isn't extremely high, but it's way brighter than regular LEDs which are typically around 80mcd. I haven't found an application yet where these wouldn't suffice. These are the LEDs I used for this button illumination mod. The reason I use two LEDs is not insufficient brightness, but to obtain a better spread. I'd recommend these everywhere unless space is an issue.
Avago Technologies HSML-A401-U40M1 (***)
- Size: SMD PLCC-4 3.2mm
- Colour: Orange 605nm
- Viewing Angle: 120°
- Intensity: 1260mcd
- Current: 70mA
- Voltage: 2.2V
- Farnell Ordercode: 1058431
The brightest BMW orange LEDs I could get my hands on. In fact they are so bright I haven't found an application yet, but I thought they may come in handy one day. The disadvantage of these LEDs is the power consumption which is a lot higher than with the other two LED types. Until I find an application where I need a lot of light, I wouldn't recommend getting these. The two other LEDs are better choices.

In the picture above you can see the EML button after the filament bulb was replaced with LEDs. No matter how bright your LEDs are, I really recommend using two LEDs put next to each other to spread the light better. The circuit board is mounted with a dab of hot glue. Both LEDs are put in series. The current limiting resistor is put underneath the LEDs in the cavity where the bulb resided.
Unlike with my HVAC/IHKA mod there is absolutely no room for an adjustable brightness control in the buttons. So I set the perfect brightness with an external trimpot, then measured the trimpot's resistance and put a resistor with similar value inside the button - 560 ohm in my setup.

The picture above shows the modified sunshade curtain button. In this button the up and down arrows are also illuminated so I had to use an extra two LEDs. All LEDs are put in series. First I was afraid I'd have to adjust the brightness individually for up, down and symbol, but that didn't turn out to be necessary. I determined the resistor to be 8k2 (8200 ohm). The resistor is put on the back of the switch circuit board. There was already one, so I just replaced it.
I don't have any pictures yet of the buttons in the car (center console is out for some other job and I still have to mod the ASC button), but I can already say that in my test setup the seat heating, EML and sunshade curtain buttons now all light up equally bright and with exactly the same color of orange... I really like the result. Some people may not care about this (or not even noticed it), but as you may have seen in some of my previous mods I go quite far in fixing/tweaking minor details :).
Btw Tony, I'd like to thank you once again for the pictures of the center vent. I finally got it out... without breaking a single bit. Couldn't have done without those pictures :). -
Nice job. The main one that annoys me is the ASC button, it's much duller than the others. I was going to try replacing the bulb/LED but couldn't work out how to open it without destroying the switch.
-
Yeah, the ASC button is next on my list. I'm waiting for a spare ASC button to arrive so I can experiment a bit with opening it without destroying it. It should be possible to cut the melted tabs in a way the PCB can be removed, while there remains enough plastic to create new melted tabs. If that fails you could make spacers sitting between PCB and button base - probably the easiest and best solution.
-
Stunning work Revtor

I'm looking forward to seeing what you do to the centre vent
Jetzt mitmachen!
Sie haben noch kein Benutzerkonto auf unserer Seite? Registrieren Sie sich kostenlos und nehmen Sie an unserer Community teil!